What is a
Saggar?
Saggar refers to any structure which encloses a piece of pottery in a kiln for firing. The saggar is usually made of clay that has been fired to a fairly high temperature, and is refractory enough to be fired many times without breaking. Saggars can be
built from bricks, kiln shelves, pottery shards, or even things like paper clay or tin foil.
Some saggars I use for smaller single pots are thrown our of
high grog clay and bisque fired. THese should hopefully last a
few firings before they need replacing. Just so long as it seals
enough to keep the combustibles in close quarters with
the surface of the pots. My larger saggars are constructed from hard brick, and large gaps
between bricks are sealed with clay or a thick kiln wash. Pots are loaded, then the top is sealed with a lid
made of old kiln shelves.
BACK
TO TOP
What is
saggar firing?
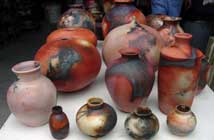
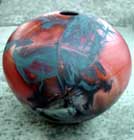
Saggar Firing was first used by the Chinese to keep wood ash off of their
beautiful celadon glazed pottery when firing with a wood burning
kiln. My saggar-fired pieces are fired in a gas kiln, but we now use these same saggars in reverse, in
that the pottery is placed inside the saggar containg combustible materials to color it's surface. The saggar is sealed with a wad
of thick kiln wash or high refractory clay. The results of each firing
are different, and like raku, there are no two pieces of saggar pottery alike due to the fact that the potter does not have total control over the patterns that are created inside it.
BACK
TO TOP
What
type of clay do I use?
I use a variety of clays. Most stoneware and white clay bodies will work just fine, with the whiter clays usually showing off with the brightest colors. Although lately
I have been liking the deeper, darker red and maroon bodies produced by
stonewares with a little iron in the body. Porcelain and some of
the very fine non-groggy clay bodies may have a tendency to
crack in saggar firing from the stresses of uneven heating and
strong fuming.
BACK
TO TOP
How
do I prepare my pots?
Bisque your pots first, or breakage will be high. The pots I fire usually have been coated with terra sigillata when they were bone dry and then lightly burnished. Before placing each piece in the
saggar, I carefully wrap it with seaweed, hay, copper 'chore boy' scouring pads,
or steel wool. The material is held in place by twine that has been soaked in salt
water with copper oxides and dried, or wrap it with copper wire,
copper tape, or tin foil. One or more bisque fired pieces are placed in each
saggar. What else I put in the kiln and on the pots is covered in the next section. The wrapped pieces are then
nestled in a layer of sawdust inside the saggar. The placement of each piece in relation to
each other, and the location of the different combustibles placed inside the saggar directly affect each piece. It is the combination of these
multiple factors that produce the assorted colors &
patterns.
BACK
TO TOP
What
items are fired in a saggar?
You can use a wide variety of materials in your saggar fire. A little
iodized salt, copper carbonate, copper sulfate, manganese, or red iron oxide are added to the sawdust mix for added flashing. When you
load your pots in the saggar, you may try including some dried
manure, Epsom salts, various fruit or vegetable peels, nuts, pits, old cat or dog food, and
different types of sawdust. I prefer fine hardwood sawdust for the most part in the bed of the
saggar 6 inches deep, and some pine shavings mixed with the
oxides to top off the saggar. There are a lot of possibilities. Experiment with different organic items!!
BACK
TO TOP
How
do I fire my saggars?
and the kiln is fired. I fire my saggars quickly in oxidation through cone 010, then reduce the kiln and fire it through cone08. I then soak the kiln in heavy reduction for 1-2 hours. I have found this to get the best colors and not burn out too much of the deep black carbonization which covers the bottoms of the pots buried in the sawdust. My saggar firings are done in an Olson 24 cu ft. updraft kiln, your results may vary considerably when firing different types of kilns
BACK
TO TOP
What
is Terra Sigillata?
Terra Sigillata (or terra sig. to cool potters) is a slip made of extremely fine
flat clay particles. The terra sig is applied to the "leather-hard", or "bone-dry" greenware, and can be burnished (or polished) with a stick, smooth pebble, back of a spoon, soft towel, chamois, or whatever works. The resulting surface is rich and shiny. Burnishing the surface was important in many cultures because the resulting tight closed surface made the pot more waterproof when fired
at low temperatures. This is because the burnishing lines up the flat clay
particles along the surface of the pot, making it very tight. This alignment minimizes the porosity of the surface. Burnished pots
should be fired to lower temperatures to maintain the shiny surface because the clay minerals begin to recrystallize at higher temperatures
as impurities in the clay body burn their way out, therefore the structure is lost leading to a dull mat surface.
BACK
TO TOP
How
do I make Terra Sigillata?
In a 5 gal. bucket put 3 gallons (or roughly 28 pints/28 lbs) of water.
Add 14 lbs. dry clay. Ball Clays works well for white base, RedArt for red.
Add enough sodium silicate, soda ash, Darvan 7, or Calgon to deflocculate (a few tablespoons).
Allow to settle. Overnight is average.
Less plastic red clays such as RedArt or fire clay may require only 6-8 hours, while very plastic clays like XX Sagger or OM4 ball may take up to 48
hours.
Remove (syphon off) the top layer of clay mixture - w/o disturbing it. This is the
sig!!!
Throw the rest away. Do not reclaim.
Terra sig is best when the specific gravity if about 1.14. Useful range is 1.1-1.5. Specific gravity is measured by weighting out 100 gms of water, marking the volume, and weighing the same volume of the sig. Divide the weight of the sig by 100. If too thin evaporate. If too thick allow to settle longer.
Apply sig to bone dry greenware making careful not to make too many drips, and buff or
Burnish to a nice shine.
Use "patinas" of 1 gerstley borate + 1 colorant as a thin wash over bisqued sigs, applied and rubbed off. Works well on textured areas.
Here are some color suggestions added to 1 cup liquid sig:
white = + 1 tsp. Zircopax or tin.
off white = + 1 tsp. titanium diox.
green = + tsp. chrome oxide
blue = + tsp. cobalt carb.
black = + 1 tsp. black stain
purple = + 1 tsp. crocus martis
|